Maria’s grandmother used to disappear into the garden every February morning, armed with nothing but an old pitchfork and a canvas sack. While neighbors stayed indoors cursing the cold, she’d spend hours poking at frozen earth that looked absolutely lifeless.
“You’re wasting your time, Nonna,” Maria would call from the warm kitchen window. But come August, that same “dead” patch would be bursting with tomatoes twice the size of anyone else’s, beans climbing higher than the fence, and squash that made the local farmers market vendors jealous.
Years later, Maria finally understood what her grandmother knew instinctively: February soil preparation isn’t about fighting winter—it’s about catching the exact moment when earth begins to wake up.
The Hidden Science Behind February Soil Preparation
February looks brutal from your kitchen window, but something magical happens beneath that frozen surface. While most gardeners wait for spring’s official arrival, the soil itself starts stirring weeks earlier.
During late winter, ground temperatures begin their slow climb while moisture levels remain perfect for working. Weed seeds haven’t germinated yet, giving you a clean slate. Most importantly, beneficial soil microbes start their annual awakening, ready to form partnerships with whatever you plant later.
“The difference between February soil work and April panic is like the difference between a gentle wake-up call and an alarm clock,” explains soil scientist Dr. James Morton. “February gives you time to do things right.”
Traditional farmers recognized this narrow window when soil transitions from winter dormancy to active growing season. They knew that proper February soil preparation could literally double their harvest yields by creating optimal growing conditions from day one.
The Ancient February Soil Preparation Method That Actually Works
Our ancestors didn’t have fancy equipment or scientific soil tests, but they had something more valuable: generations of observation. Their February soil preparation routine followed five precise steps that maximized every advantage this transitional month offered.
Step 1: The Soil Readiness Test
Before touching a single tool, experienced growers performed what they called “the squeeze test.” They’d grab a handful of soil and squeeze it firmly.
- If water dripped out or the soil formed a solid, sticky ball, they waited
- If it crumbled like powder, the soil was too dry and needed light watering first
- The perfect consistency felt like a damp sponge that held together but broke apart with gentle pressure
This simple test prevented the biggest mistake modern gardeners make: working soil when it’s too wet or too dry, which destroys soil structure for the entire growing season.
Step 2: Gentle Awakening, Not Destruction
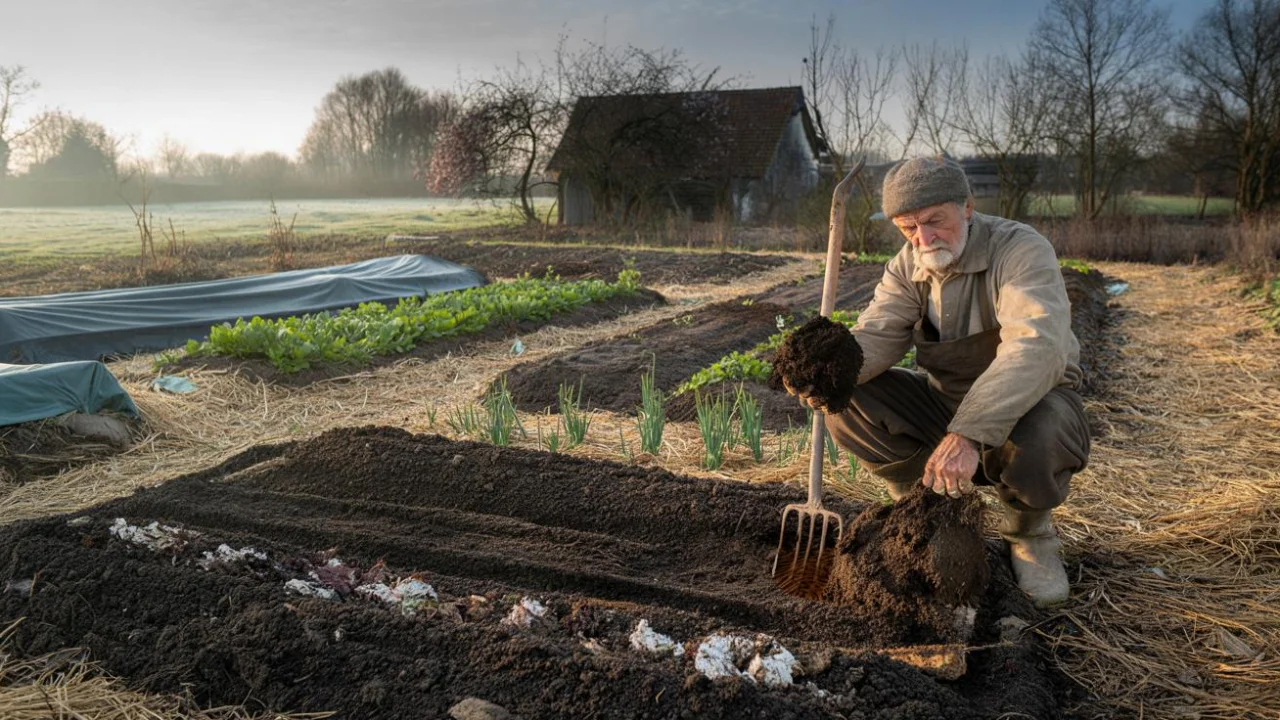
Instead of aggressive tilling that flips soil layers upside down, ancient farmers used what we’d now call “broadforking.” They’d push a fork straight down every 6-8 inches and rock it gently back and forth.
“They understood instinctively that soil has layers for a reason,” notes agricultural historian Dr. Sarah Chen. “Their goal was creating air pockets and drainage channels, not chaos.”
This technique opened pathways for roots and water while preserving the delicate ecosystem of beneficial organisms that had been building up all winter.
Step 3: The Strategic Amendment Addition
February soil preparation included adding organic matter, but timing and type mattered enormously. Traditional farmers had specific rules:
| Soil Condition | February Amendment | Why It Works |
|---|---|---|
| Clay/Heavy | Aged compost + coarse sand | Improves drainage before spring rains |
| Sandy/Light | Well-rotted manure + leaf mold | Adds moisture retention for growing season |
| Acidic | Wood ash or ground limestone | Time for pH adjustment before planting |
| Alkaline | Pine needles + organic compost | Gradual acidification during winter |
Step 4: The Protection Layer
After loosening and amending, ancient farmers never left soil bare. They’d spread a thin layer of straw, leaves, or aged hay across the surface. This served multiple purposes during February’s unpredictable weather.
The mulch prevented erosion during late winter storms, kept soil temperature more stable during freeze-thaw cycles, and began breaking down slowly to feed soil organisms throughout the season.
Step 5: The Patience Practice
Perhaps most importantly, traditional farmers knew when to stop. After completing their February soil preparation, they’d stay off the beds entirely until planting time, letting their work settle and integrate naturally.
“Modern gardeners want to keep fussing and fixing,” observes master gardener Tom Rodriguez. “The old-timers understood that soil, like bread dough, needs time to develop properly.”
Why This Method Doubled Harvest Yields
The remarkable harvest increases from proper February soil preparation weren’t magic—they were the result of creating optimal growing conditions from the very beginning of the season.
When soil is properly prepared in February, plant roots can penetrate deeper and spread wider from day one. Deeper roots mean better access to nutrients and water, leading to stronger, more productive plants.
The early organic matter additions have time to integrate fully into the soil ecosystem before planting begins. This creates a rich, living environment that supports plant growth throughout the entire season, not just the first few weeks.
Water management becomes dramatically more efficient. Well-structured soil from February preparation holds moisture during dry spells but drains excess water during heavy rains, preventing both drought stress and root rot.
“Plants grown in February-prepped soil consistently outperform those planted in hastily prepared spring beds,” confirms agricultural researcher Dr. Patricia Williams. “The difference in root development alone can account for 40-60% yield increases.”
Modern Lessons from Ancient Wisdom
Today’s gardeners can easily adapt these time-tested February soil preparation techniques using modern tools and materials. A broadfork or digging fork works perfectly for the gentle loosening step. Bagged compost and organic amendments are readily available at garden centers.
The key insight remains the same: February offers a unique window when soil conditions are perfect for preparation work that sets up the entire growing season for success.
Smart gardeners watch weather forecasts for a string of days when temperatures rise above freezing and precipitation stops. These brief windows—sometimes just 2-3 days—are precious opportunities for effective February soil preparation.
The investment of a few cold morning hours in February pays dividends all season long in stronger plants, better yields, and fewer pest and disease problems.
FAQs
Can you really prepare soil when it’s still winter outside?
Yes, but only when conditions are right. The soil should be thawed but not waterlogged, which often happens during brief warm spells in February.
How do you know if soil is ready to work in February?
Use the squeeze test: grab a handful of soil and squeeze it. If it crumbles like moist cake crumbs, it’s ready. If it drips water or forms a hard ball, wait for better conditions.
What’s the biggest mistake people make with February soil preparation?
Working the soil when it’s too wet, which compacts it and destroys soil structure for the entire growing season. Patience is crucial.
Do you need special tools for February soil preparation?
A simple garden fork or broadfork is ideal. Avoid rototillers or other aggressive tools that flip soil layers upside down.
How long should you wait after February soil prep before planting?
Give the soil at least 2-4 weeks to settle and integrate amendments before planting. This waiting period is essential for the method to work properly.
Does this method work in all climates?
The principles apply everywhere, but timing varies by region. In warmer zones, “February preparation” might happen in December or January, while colder areas might wait until March.
Related Posts