Margaret stared out at her back garden last November, watching her once-pristine lawn transform into something that looked more like a forest floor. Dark patches of moss had crept across the grass overnight, turning her pride and joy into a spongy, patchy mess. She’d spent hours that spring raking out moss, reseeding bare spots, and feeding the lawn, only to watch the same thing happen again.
“I felt like I was fighting a losing battle,” she says. “Every autumn, it was the same story. The moss would just take over, no matter what I did.”
Then her Dutch neighbor shared a simple trick that changed everything. No expensive treatments, no backbreaking work—just one small habit that stops moss before it even gets started.
Why Your Lawn Becomes a Moss Paradise Every Year
Moss doesn’t just randomly decide to move into your garden. It’s actually quite picky about where it sets up home, and unfortunately, many British lawns offer exactly what it’s looking for.
The three things moss absolutely loves are acidic soil, constant moisture, and shade. When your soil becomes too acidic—usually from rainfall washing nutrients away—grass struggles to absorb what it needs. The blades become thin and weak, creating perfect gaps for moss to colonize.
“Moss is nature’s way of telling you your lawn is stressed,” explains soil specialist Dr. James Crawford. “It’s not the enemy—it’s actually highlighting problems that need fixing.”
The moisture factor makes things worse. In areas under trees, beside hedges, or on north-facing slopes, soil stays damp longer. Waterlogged ground lacks oxygen, suffocating grass roots while moss thrives in these soggy conditions.
Before you even see moss taking over, your lawn usually sends warning signals:
- Grass that looks pale or yellow despite regular feeding
- Thin patches where you can see bare soil
- A spongy feeling underfoot instead of firm ground
- Soil that stays muddy for days after rain
- Areas that never seem to dry out completely
The Dutch Moss Prevention Method That Actually Works
While British gardeners have been locked in an endless cycle of raking out moss each spring, Dutch gardeners discovered something clever: prevent the problem instead of treating it after it happens.
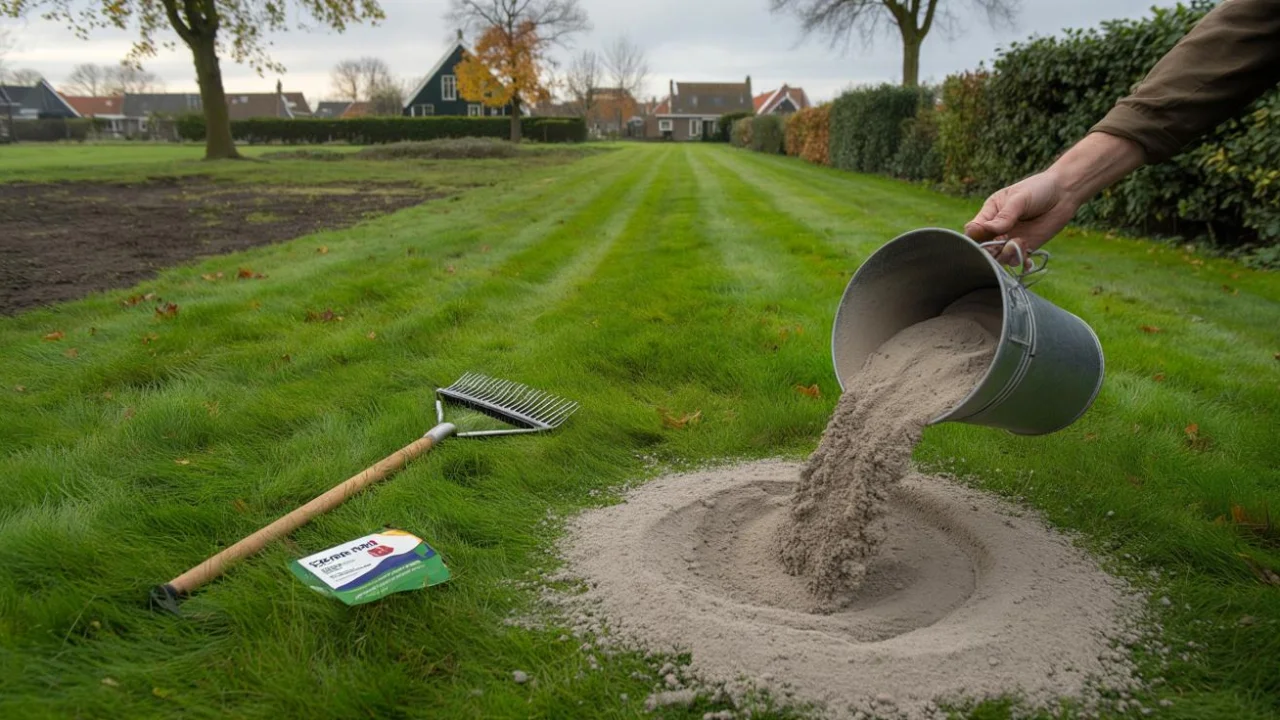
Their secret weapon? Wood ash from their fireplaces and wood-burning stoves. Every autumn, they spread a light dusting of clean wood ash across their lawns, creating conditions where moss simply can’t establish itself.
Wood ash is naturally alkaline, containing potassium carbonate and calcium carbonate that gently raise soil pH. When applied correctly, it shifts acidic soil back toward neutral, creating the slightly alkaline conditions grass loves and moss hates.
“The beauty of this method is its simplicity,” says Amsterdam-based lawn care expert Pieter van der Berg. “You’re not fighting moss—you’re making your lawn a place where moss doesn’t want to live.”
Here’s how the Dutch lawn moss prevention technique works in practice:
| Timing | Late October to early November, after leaves have fallen |
| Amount | One small bucket (about 2kg) per 100 square meters |
| Application | Light, even dusting using a broadcast spreader or by hand |
| Weather | Apply on a calm, dry day before expected rain |
| Frequency | Once yearly, consistently each autumn |
The key is using only clean wood ash from untreated timber. Coal ash or ash from painted wood contains harmful chemicals that can damage your lawn and contaminate your soil.
What Happens When You Get the Timing Right
The Dutch technique works because it addresses the root cause rather than the symptoms. By autumn, your soil has typically become more acidic from a summer of rainfall. This is exactly when moss spores are looking for new territory to colonize over winter.
Applying wood ash at this crucial moment creates a hostile environment for moss while giving grass the alkaline boost it needs to stay strong through winter.
“We’ve seen pH levels rise from 5.5 to 6.8 within six months of treatment,” notes soil scientist Dr. Emma Richardson. “That’s the difference between moss-friendly and grass-friendly soil.”
The results aren’t immediate—this isn’t a quick fix. But gardeners who stick with the method report dramatic changes by their second spring:
- Thicker, healthier grass that crowds out potential moss growth
- Better drainage as soil structure improves
- Reduced need for moss treatments and reseeding
- Lower maintenance overall
Margaret, who started using wood ash three years ago, now has neighbors asking for her secret. “My lawn stays green and thick right through winter now,” she says. “I haven’t had to rake out moss once since I started this routine.”
Getting Started With Dutch Moss Prevention
The best time to begin is this autumn, but you’ll need to source clean wood ash first. If you don’t have a fireplace, many garden centers now stock wood ash specifically for lawn care, or you might find neighbors with log burners happy to share.
Start by testing your soil pH with a simple kit from any garden center. If it’s below 6.0, your lawn is definitely struggling with acidity and will benefit from this treatment.
Apply the ash evenly on a still day—wind can blow it onto plants that prefer acidic conditions, like rhododendrons or blueberry bushes. A light dusting is all you need; you should still see grass through the ash layer.
“Less is definitely more with this technique,” warns van der Berg. “Heavy applications can shock the grass and create bare patches where weeds take hold.”
Rain will wash the ash into the soil naturally, beginning the pH adjustment process. By spring, you should notice grass looking more vibrant and filling in naturally.
FAQs
Can I use any type of ash on my lawn?
Only clean wood ash from untreated timber should be used. Coal ash, charcoal ash, or ash from treated wood can contain harmful chemicals.
How long does it take to see results?
The pH change begins within weeks, but visible lawn improvements typically appear the following spring. Full benefits develop over 2-3 seasons.
What if I don’t have access to wood ash?
Garden lime works similarly but acts more slowly. Agricultural lime is another option, though wood ash provides additional potassium that grass loves.
Is this method safe for pets and children?
Yes, clean wood ash is safe once applied and watered in. However, avoid letting pets or children play on freshly treated areas until after the first rainfall.
Will this harm acid-loving plants nearby?
Wood ash can affect soil pH in surrounding areas, so keep applications away from rhododendrons, azaleas, and other plants that prefer acidic conditions.
How often should I apply wood ash?
Once yearly in autumn is sufficient. Over-application can make soil too alkaline, creating different problems for your lawn.
Related Posts